

Testimony: How to monetize your copyrights as a photographer
Image Protect is our online image tracking partner. If you aren’t using it yet, it’s an unbelievably useful system for photographers which uses industry-leading software to find where photos are being used. Once you activate it, it constantly and automatically searches for the photos you pick. Also, its platform brings together visual artists and copyright experts.
This way, Image Protect assists professional photographers to automate the tiring process of finding unauthorized uses of their works. Not only that, it also takes care of the legal actions to monetize those same infringements.
Eric Hernández, a professional photographer and Image Protect user shares his personal experience with us and some advice.
Organize your data.
We believe that Eric’s system is an excellent first approach. It should be easy to replicate by most professional photographers.
The first thing to save time and let the tool work for you is to organize your information. You’d want to store certain documents in such a way that they’re easy to find, in order to speed up processes. We’re talking about files which you should keep organized anyway, whether you use Image Protect or not.
Make sure you have a good system to save:
- Original photos.
- Commercial information:
- Your usual fees per sale and license.
- Invoices and sales information.
- Registration certificates.
I organized all of the sales data & licenses I had granted to clients and through various stock photo agencies. I used the sales data to decide which uses were unauthorized, and then submitted those cases to be reviewed by the Image Protect Licensing Team.
I uploaded my copyright registration certificates and sales data to the image portal. This helped in obtaining the highest licensing fees.
(Eric Hernández)

Improve your results using filters.
Once you’re using Image Protect, you can create filters to quickly identify infringements with revenue potential. Don’t waste time checking every single match.
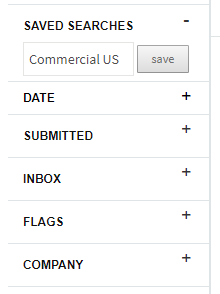
After creating an account with Image protect, I uploaded my images. I found the best way to filter though the many sightings was to create “Saved Searches” focused on Commercial websites in the United States. (Eric Hernández)
In order to do this, you’ll need an Image Protect account. You can create one and synch it with Safe Creative from our website, going to “Services” > “Image Tracking”.
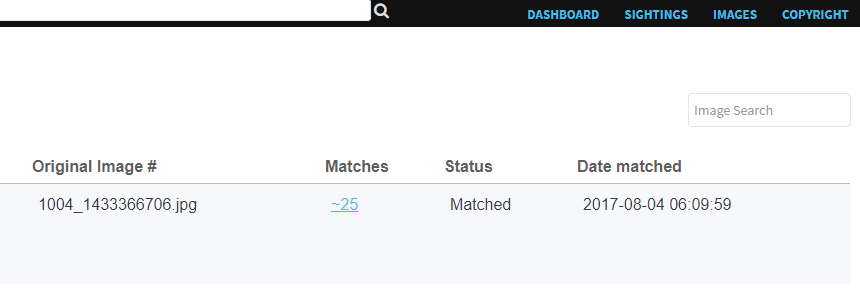
When you enable tracking on your registered photos, you’ll be able to manage them at Image Protect. To do so, click on “Details” on the photo match in your “Image Tracking” dashboard at Safe Creative, or just log in at Image Protect.

Once there, you’ll see the lists of matches in the “Images” page. Click on the photo whose matches you’d like to check, and on the number in the column named “Matches”.
You can create filters using the criteria in the left-hand column. To copy the one that Eric uses, select “Site Type” > “Commercial”and“Countries” > “United States”, then click on “Apply Selected Filters”.

To save time and reuse this search in the future anytime you need, click on the “+” icon next to “Saved Searches” and name your search. Choose a name that will help you remember the criteria or the purpose of the filters. Then, click “Save”.
Recommended: USCO Registration.
 In order to have more chances to succeed, especially if you are sending copyright claims to commercial US websites, we recommend you to send your photos to the US Copyright Office. Safe Creative includes a wizard to send photos to the Office. It will grant you higher chances of success when negotiating.
In order to register photos in USCO from Safe Creative’s wizard, go to “My registrations” and check all the photos you’d like to send. After checking them, select the “Register in USCO” option from the “Manage selected” menu.
Make sure that all the works you’re sending are of the same kind (photos in this case) so your request can be accepted.
We remind you that the US Copyright Office has sent a new limit on the number of photos that can be registered in one go this year. The limit per sending is 750 photos. (Read more)
Related articles:
- How to find your images online and what to do in case of copyright infringement.
- What is the USCO registration and why is it interesting to me?
- What do I have to do and what information should I provide to ease the USCO registration of my work?